Tag Archives: gradients

Freebie Pack

Nearly another month since my last update, but this is a special month for me as it is my birthday tomorrow, and I wanted to do something special for elucidation, I see other community sites doing freebies and bundles so I thought I’d make some freebie stuff that people can use, also becuase this month someone opted for freebies on the poll at the bottom of the page.

[5 mb zip file]

In this bundle you get my all time favourite gradients, I have three in this bundle that I have used all the time but I’ve never put them in to a gradient set till now.

– Two tone set which has various tones that fade into a similar tone [view gradient]
– There is also a a HDslr set which are bright red and orange gradients which I have been using to help me recreate HDR style photographs [view gradient]
– And my favourite one which I have called heaven and earth because it combines earth tones and sky tones to bring out the colours in photographs which have both sky and other features in it [view gradient]

I have also added some photographs I have taken of torn paper, I always find it hard to find torn paper that is big enough to fit on my wallpapers, the torn paper in this bundle is very large and maybe a little blurry in section but the size of each piece is at least 1920px in width or height depending on whether it is landscape or portrait which should be big enough for almost all wallpapers (15 photos in total) [view photo set]

and finally I have made some textures out of the paper stock photographs (8 Textures in total) [view texture]

you can download the bundle here or you can have a look at my gallery and download each part individually.

[5 mb zip file]

How to Use Gradients

There is no set way in how to use gradients however I am going to show you the way that I think is best, it will hopefully show you that its not just a slap on effect but can make blending gradients easier and look better.


1. have your image to the ready. It doesn’t matter what stage your image/art is at, you can add gradients at all stages of art work I always find it best not to add gradients at the end (although not always) So when you have your image ready look to the layers pallet and click on the adjustment button at the bottom of your pallet, it looks like a circle that’s half black and half white.


(N.B. if you click the arrow in the circle next to the list of gradients you will get an even bigger list for you to select from)
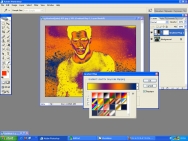
2. Select GRADIENT MAP and a small window will pop up, with a large gradient and with an arrow next to it, if you click on the arrow you will get a lot of other choices of gradients.


3. Once you have chosen your gradient, you will see that even though the gradient is showing on the image you can still see the underlying image, this is in my opinion what makes it blend better. Im not sure why but it does look better.


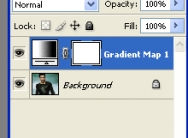
4. here you will notice that a new layer has been created on you layer pallet, it is this layer that you can edit and modify so without ruining the image or the layer you can edit it all you want.
for editing the layer you would have to use the layer mask which is the white square next to the layer preview. If you want to change the gradient all you have to do is double click on the layer preivew.


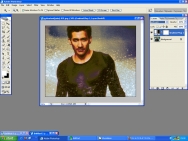
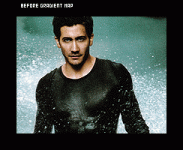
5. usually with gradients I just change the Layer Mode and change the opacity, because I like to have all my colours and tones equal to each other. here is an example of what I did with this image of Jake.


6. The best advice I can give you about gradients is don’t be afraid to use horrible and shocking gradients, as you see with the one I used the horrible Yellow and sickly greens Blue and Purple, actually made a nice tone to the image, I also find with gradients they make the image textured simply by highlighting shadows that were unseen before the gradient map was added.