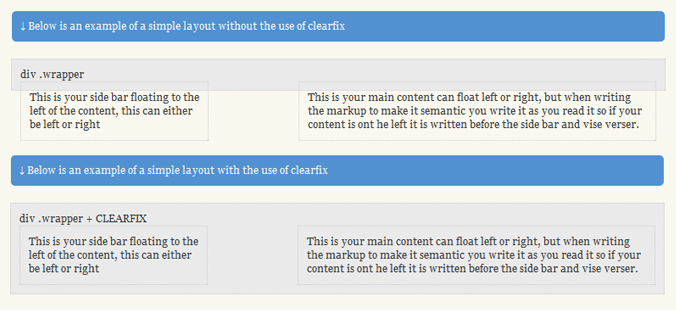
You may be wondering what the hell a clearfix is? Well quite simply its a better way of doing clear:both. Its fool proof and works in all browsers, and if you’re not sure what clear:both does, it basically puts a full stop after any floating div.
I see it a lot of the times on forums where people are having problems with their layouts or with the new staff at my work its generally the first thing we have to teach them, there are many problems that can occur when you apply floating div’s but 9 times out of 10 the clearfix will fix it! That’s how fool proof it is. If you can remember to use this you will find that coding sites will be much easier. Below is an example of the most basic error so you can see what I mean.
Live Preview [opens in new window]
So you must be thinking if this clearfix fixes so many problems it must be a pretty hefty piece of code, well no its really simple actually:
.clearfix:after { content:'.'; display:block; height:0; clear:both; visibility:hidden }
.clearfix { display:inline-block }
* html .clearfix { height:1% }
.clearfix { display:block }
That is all it is! Its CSS so its cross browser compatible, which if you’re in the web design industry you will find everything needs to be these days as you can see there are several different rules, these are as the first one .clearfix:after won’t be accepted by all browsers so there are separate rules that if all else fails the other rules will work.
There is even a shorter version but this hasn’t been tested on ie6 but it works all the way down to ie7 so if you’re like me and don’t really care about the people using ie6 as if they can’t update their browser they shouldn’t be on the internet (either because they are at work or they obviously don’t care about the quality of the websites they visit) you can use the code below.
.clearfix:before, .clearfix:after { content: ""; display: table; }
.clearfix:after { clear: both; }
.clearfix { zoom: 1; }
Ok so we know what we need to put into the style sheet but if you don’t put it in your markup correctly it’s just not going to work, so to make sure we know how to put it into the markup we need to understand what it does.
Like I said above what you are basically doing is putting a full stop after all the floating div’s that are causing you problems, to illustrate this I’ve mocked up a problem I’ve seen in the past and generally the most common problem. Where you can see the wrapper div doesn’t fully extend the two floating div’s. You may think it’s not a problem now, but if you wanted to add a footer or add a background to the wrapper div you’re going to have a problem.
By simply adding the class of clearfix to the surrounding div you can see that the div now extends around the entire layout which is great if you want to create sections to sites you can clearly define the area while not being limited to what you can do within the area.
I have created a wireframe of the homepage of Lucid Fanart to show you how it would look without the clearfix and the simple css has saved me a lot of time, and a lot of screwy hacks trying to make everything fit into the space perfectly. As you can see from the example the dark black lines are the areas where I’ve put the clearfix and you can see a difference in the way everything lines up I haven’t even set positions on things I’ve simply written out the markup and done a few lines of CSS and it simply falls in to place.
Live Preview [opens in new window]
I hope you found this tutorial useful and that you are able to use the clearfix, if you need any help please post below and I’ll talk you through it, if you have an example please add it in and I’ll try and help specifically to your design.


